Many of you may know by now my penchant for scrapbooking- and now that has crept into my doll world. A few years ago, I had created a miniature 1:12 scale scrapbook store from scratch, and with 1:6 scale one of my bucket list dioramas to do was a scrapbook store. But not just any- no, everything must if possible be made from found materials, the dio must be lightweight though permanent, and built and finished.
I started on this project a couple of days ago, but made alot of progress today. This project could easily be finished within one day IF- (and I mean if!) you don't have a suspicious husband on the alert for more large fashion doll dioramas that will be 'in the way' -meaning his line of vision to the TV, or kids asking you what are you making? every hour, or a hubby that wants you to stop at a key tricky moment in the glue and paint process 'to show you' what he has excitedly found in his truck) Ya know what I'm saying- no interruptions. Diorama building for me is a huge relaxation/stress reliever factor, and I hate stopping once I am on a roll.
I used a large cardboard box 20 x20 x 20 cut down to size. I also used 1:12 scale dollhouse Houseworks window components as well as a 1:6 Houseworks crossbuck door that I already had on hand- will need to buy another.
Here is what the project looks like right now-


This is the outside front and back with the big window. The windows are still unpainted. The exterior I used spray flex stone in a cream with flecks of black, white and beige in it all over the exterior three sides of the box.
Here is what I started with-




All safe and secure. You don't want these flaps of cardboard coming up into the display....


I used a black piece of foamcore that was past its show/backdrop prime, and cut it down to fit. Remember, I did not want to go out buying cardboard for a cardboard box dio! lol. Use what you have on hand.


 Ta da! Inserted door...now moving on!


 If you have noticed, I also lightly primed the interior of the cardboard with white spray paint. You can see where the window openings have been covered with the tan tape over the unfinished edges. If I had had my interior wallcoverings I would have been almost finished. The ceiling is another piece of cardboard, spray painted white that will be fastened and glued on top. Tomorrow I will probably buy the strip moldings for the floor and ceiling and the wallpaper. I am planning on using a coordinating color with the flex stone on the exterior of the building- everything must be neutral colors , that way the miniature scrapbook papers, punches, and pages will all 'pop' or stand out more and look really awesome. This scrapbook store will also be more of a mixed media Somerset studio type of deal-- my favorite scrapbook store that closed near me was into this and we did classes with creating bracelets with pictures, charms, buttons, etc. as well as memory jewelry and boxes, art dolls- not just scrapbooking albums. She also had drawing classes, which I may do here in this little diorama too. My Poppies love art and I cannot think of a better thing to have in Barbietown than an art/scrapbook studio!
The name for this business in Barbietown will be The Scrap Box Studio- catchy isn't it? After I finish the interior wall coverings, then it will be time to make the cardstock shelves. In Between I have been cutting down my paint chip samples for my cardstock and the Poppies have insisted on all colors of the rainbow.
Enjoy the photos and the mini tutorial! ~Lisa
I started on this project a couple of days ago, but made alot of progress today. This project could easily be finished within one day IF- (and I mean if!) you don't have a suspicious husband on the alert for more large fashion doll dioramas that will be 'in the way' -meaning his line of vision to the TV, or kids asking you what are you making? every hour, or a hubby that wants you to stop at a key tricky moment in the glue and paint process 'to show you' what he has excitedly found in his truck) Ya know what I'm saying- no interruptions. Diorama building for me is a huge relaxation/stress reliever factor, and I hate stopping once I am on a roll.
I used a large cardboard box 20 x20 x 20 cut down to size. I also used 1:12 scale dollhouse Houseworks window components as well as a 1:6 Houseworks crossbuck door that I already had on hand- will need to buy another.
Here is what the project looks like right now-


This is the outside front and back with the big window. The windows are still unpainted. The exterior I used spray flex stone in a cream with flecks of black, white and beige in it all over the exterior three sides of the box.
Here is what I started with-

First, I cut down the box with one side open for furniture and doll placement.


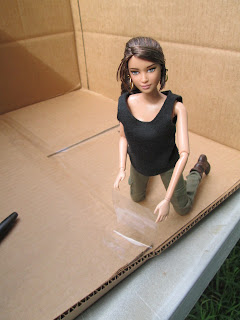
Katniss and I taped down the bottom flaps of the box with packing tape. The floor will be made of foamcore cut to fit, then papered with contact wood grained shelf paper.

There we go!

All safe and secure. You don't want these flaps of cardboard coming up into the display....


I used a black piece of foamcore that was past its show/backdrop prime, and cut it down to fit. Remember, I did not want to go out buying cardboard for a cardboard box dio! lol. Use what you have on hand.

Next we're going to cut out our window and door spaces.

Be sure to have your windows and door on hand so you can measure.


I DID buy this tan packing tape, but you can also use masking tape, or painter's tape- it won't matter since your exterior wall finishes will cover up this tape. I do this to seal the unfinished edges of the cardboard. Remember, this is a layered paper base product, we want to protect it as much as possible, while also reinforcing the cardboard.

Here is Kat inside, welcoming us into the new shop. Her clients will be happy to see that it is moving along so well. The black foamboard has been covered with wood grained contact paper.


The name for this business in Barbietown will be The Scrap Box Studio- catchy isn't it? After I finish the interior wall coverings, then it will be time to make the cardstock shelves. In Between I have been cutting down my paint chip samples for my cardstock and the Poppies have insisted on all colors of the rainbow.
Enjoy the photos and the mini tutorial! ~Lisa


